Writer dishes the dirt on a great home project
By Maris Lawyer (Posted April 14, 2020):
 Like the rest of the nation, you are probably spending a lot of time at home right now during the COVID-19 social distancing advisory. And, for many people, that means your children are cooped up in the home as well. If you’re looking for a family project that is educational and productive, why not consider creating a worm farm?
While “worm farm” may not sound particularly glamorous, it’s actually the perfect project to undertake if you’re stuck at home. All materials can be ordered online and assembled at home, and the maintenance of a worm farm is fun and educational, especially for kids. As an added bonus, the worm farm will produce nutrient-rich worm castings that you can use in your garden.
For those unfamiliar with worm farms (otherwise known as “wormeries”), a worm farm is a simple construction to keep worms for the purpose of composting kitchen scraps and, ultimately, for collecting worm castings to enrich your garden soil. Creating a worm farm couldn’t be easier. Simply purchase (or order online!) a pair of heavy-duty plastic tubs. The plastic has to be opaque, not clear. The first tub will serve as a basin for collecting excess liquid (we’ll talk about that later) and for insulating the worm farm. The second tub serves as the actual “house” for the worms. All you have to do is drill a couple small holes into the bottom of the tub for drainage, and a few on the sides for added airflow. Snap on the lid at the top to protect the worms from light and from hungry worm-eating critters.
Not feeling like assembling your own worm farm? Guess what — you can order one online.
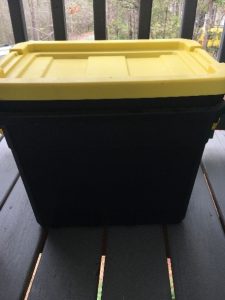
An example worm farm container.
Now for the stars of the show: the worms. And yes, you can order worms online as well. There are multiple kinds of worms that you can choose from — I selected red wiggler worms, because they are vigorous breeders while not being invasive in my area if/when they are released into open soil. (Fun fact: Many scientists don’t consider worms to be native to North America at all, but brought over many centuries ago from Europe and Asia — but that’s for another blog post.)
While you are waiting for your worms to arrive, prepare the worm farm. From most online providers, the worms will be very small when they arrive, so they won’t need a lot of food in the beginning. What they will need is some plain soil as a sort of “bed” in which they can recover. You can use compost or potting soil, but the best option is actually to put in a scoop of dirt from your own yard. Your native soil contains living microbes that bagged soils can’t provide, and these microbes are beneficial to the worms — but either option will suffice.
With the soil, include a 50-50 ratio of brown and green materials. “Brown” materials are carbon-rich substances like dried leaves, cardboard, shredded paper, etc. “Green” materials are things like vegetable scraps, grass clippings, fruit peels, etc., which provide nitrogen to the mix. These materials are important not just for the worms as food, but they also contribute to the nutrition of the final worm castings (which is like fertilizer on steroids — plants LOVE it!).
Give your soil and your brown and green materials a little mix before adding in your freshly mail-delivered worms. From there, give the whole concoction a generous watering, using rain water if at all possible. (Worms don’t like the chlorine added in tap water.) Worms like very moist soil, but they shouldn’t be drowning — as a test, squeeze a clump of the dirt in your hands. If a few drops of water come out, it’s perfect. If the dirt leaks between your fingers like mud, it is probably too wet.
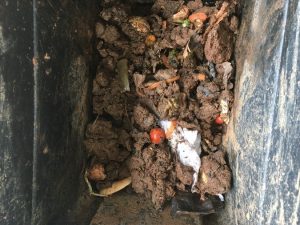
A prepared worm farm soil mixture.
Except in extremes of cold, the worm farm can be kept on a porch, or somewhere else where you can easily access it. Check the wormery every couple days to see if the worms are engaging with the food. (You should see them clustered around scraps of food or paper.) For more details on what kinds of scraps to use (or not use) and other tips, you can visit this website: https://unclejimswormfarm.com/composting-worms-mistakes/
For children, it’s fun to check in on the worms and see how they’re growing and multiplying. Growing up, my family had a worm farm, and taking care of the wormery taught me and my sister about soil, plants, and insect life. My mother, a licensed dietician before becoming a stay-at-home mother, also taught us about nutrition using the worm farm. Vegetable and fruit scraps are the ideal green materials to add to the worm farm, so she would have us create “menus” for the worms based on what we ate that day. So, carrot peels, strawberry tops, apple cores, etc. made their way into the wormery, and we learned more about the vitamins and nutrients in our own diet.
After several weeks, your worms will have processed through a large quantity of materials, and what started as lumps of dirt and kitchen scraps will start to look like rich compost. You can take scoops of this compost — called worm castings — and add it to your garden to help plants grow vigorously. And, don’t forget to check the bottom tub in your worm farm — you’ll discover it’s collecting a concentrated liquid that has filtered down through the wormery. Don’t discard it — it’s almost more nutrient-packed than the actual worm castings! You can add this liquid to a watering can and it serves as a fantastic liquid fertilizer.
As we all continue to spend time at home, and as gardening season is kicking up, I can’t think of a better time to start a fun family project that will produce fertilizer gold. My own wormery, started back in February, is beginning to yield scoopfuls of worm castings that I’ve added to my vegetable garden — which is growing like crazy!


